

Gluten Free Sourdough Bread: The Master Recipe
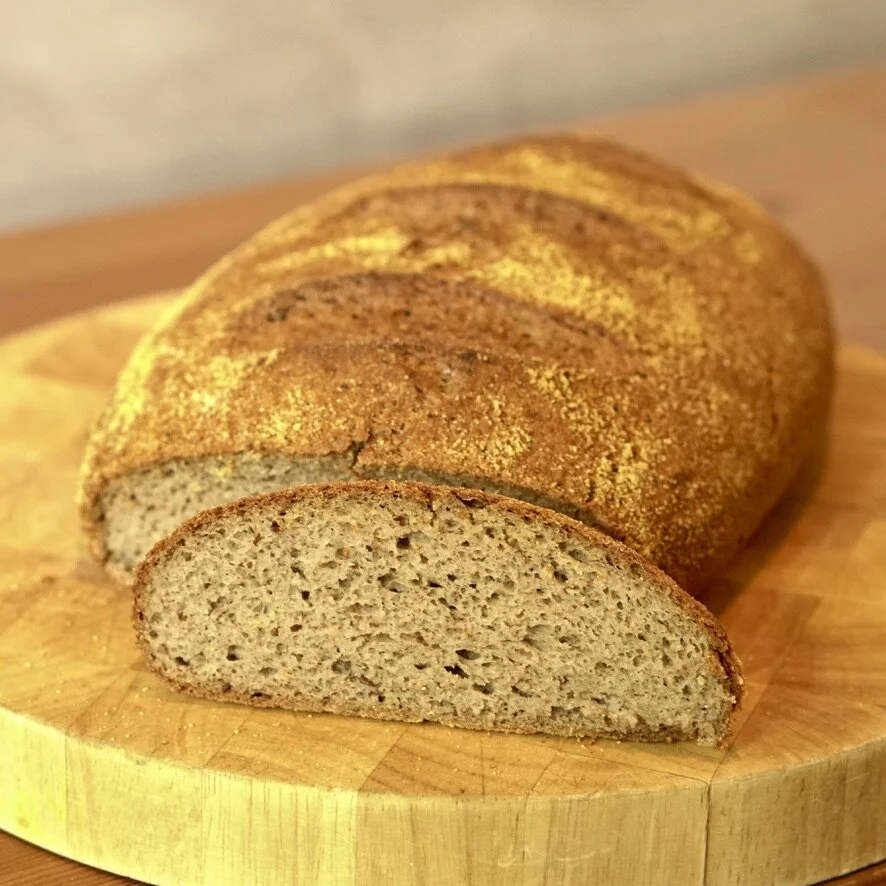
Soft, airy, whole grain, gluten-free sourdough bread with NO refined sugar, artificial binders or gums. Jackpot! This bread is 68% whole grain flours, and fermented naturally by a gluten-free sourdough culture. This recipe is the base for all my other bread variations. The timing is set up so you can bake bread first thing in the morning!
I have been fully gluten-free since 2011. It’s been amazing to watch the food industry boom with gluten-free products, but also frustrating to feel like if I wanted to partake in a loaf of gluten-free bread or a dessert, I had to accept all the additives, refined sugar, gums and stabilizers that went along with it. As someone with an autoimmune disease, eating those kinds of refined/processed products feels completely counter-productive to my health, even if it is gluten-free.
Enter, sourdough! 1 year ago I was working in Macau, and had a good amount of free-time available. A friend of mine had been given a piece of Italian sourdough starter from a bakery in Hong Kong, and we thought it might be fun to see if we could convert some to gluten-free flour. It took a year of experimentation, but I’ve finally found an incredible recipe and method for baking flavorful, healthful and easily digested gluten-free bread. I am so excited to share it with you!
Ingredient Fun Facts:
- buckwheat flour: makes up the largest percentage of the flour mix for this bread. Buckwheat is a high-protein grain, which creates a great structure for breads and pastries, and provides a satisfying hearty, earthy taste
- brown rice flour: less processed than white rice flour, is quite sticky and naturally tangy in flavor. This flour can be replaced with white rice flour or millet, but I’ve found to be pretty widely available for purchase
- oat flour (gluten free): oat flour is the 3rd whole-grain flour in the mix, which can be bought or made at home from gluten-free rolled oats processed in a blender. It is important to buy certified GF oats/flour if you have celiac! Oats are often processed in the same facilities as wheat. Oat flour has a fantastic sweet and nutty flavor that balances out the buckwheat and brown rice beautifully. It can be replaced by sorghum flour as needed
- tapioca and arrow starches: grain-free, these root vegetables are dried and processed to remove the starch. This high starch content makes this flour incredibly sticky and helps to keep the bread together without the gluten or artificial binders.
- ground flax seed: element 1 of the faux-gluten in this bread, ground flax seed is highly absorbant and when mixed with water creates a gel that helps give the bread structure. Flax seeds have a fabulous nutty flavor and are very high in fiber (and grinding them makes the fiber more available to our digestive system).
- psyllium husk powder: element 2 of the faux-gluten, psyllium husks are also highly absorbant and when mixed with water create a gel mixture. Combined with the flax seed, this natural binders are what allows the bread to hold shape, be handled and rise in the oven without collapsing and making a dense bread.
- active gluten-free sourdough starter: the life source of our bread, the gluten-free sourdough starter should be fed and then allowed to about double in size before using. More information on sourdough starter here.
- olive oil: added at the end help create a well-hydrated, smooth, and cohesive dough that can be gently shaped after the initial rise
- cornmeal: the best secret weapon for a gluten free crust. Cornmeal is also a high protein grain, and when dusted onto either side of the bread before baking, in addition to baking with a steam pan, helps create a crispy, crunchy crust!
Optional: for a soft crust, whisk 1 egg and 1 tsp of water together and brush onto the surface of the loaf before baking, following the rest of the recipe as-is

How to Make Gluten-Free Whole-Grain Sourdough Bread:
Note: The whole process of making a loaf of sourdough takes about 24 hours in total, but it really involves just little bursts of effort! 24 hours in advance, do necessary preparations to get your gluten-free starter active. For more information on how to do this, visit my post on starter care and use here.
Make the dough:
1. Once your starter is active, and you are about 13-15 hours in advance of wanting to bake your bread, it is time to make the dough. For me this is usually early evening, around 6pm. Weight out/measure all of the dry mix into a large mixing bowl and combine thoroughly. Set aside.
2. In a medium mixing bowl, measure out the psyllium, ground flaxseed and sourdough starter. Then pour the water over top, trying to soak as much as possible. Add the salt and maple syrup and stir well to combine. A viscous texture will form from the flax and psyllium beginning to absorb water.

3. Mixing by hand method (see recipe notes for mixer instructions): with a soup spoon or large wooden spoon in hand, pour the wet ingredients into the dry and immediately start stirring vigorously in circles in the center.As more of the dry ingredients are incorporated, you can begin widening the circle and trying to incorporate all the flour into the wet ingredients. This is time sensitive as the the flour , psyllium and flax are beginning to absorb the liquid mixture. I find this method creates a more workable dough than most gluten free recipes that make a wetter batter. The dough will still be quite thick and sticky, so I don’t recommend mixing with the hands.
4. Once the dough is well combined, it will look like a wet, shaggy ball of dough. Add the olive oil across the top and sides of the dough and with the spoon or a silicone/baking spatula if you have one (silicone spatula’s are my favorite kitchen tool ever), spread the olive oil on all sides of the bread while simultaneously smoothing and shaping the dough into more of a ball. Get some oil on the bottom as well, for my this usually becomes a gentle turning over of the ball of dough as I go.
Rest and Shape:
5. Cover the dough in an airtight container and leave to rise in a warm, non-drafty place for 2-3 hours depending on the temperature. I like to use a glass bowl for this part so I can check the bottom and see how the air bubbles are forming, this indicates when it is ready. Hot tip: use a shower cap and a plate over the bowl to avoid using single use plastic wrap! The dough will expand but not double in size, this won’t be as obvious from the top of the dough.
6. After the dough has expanded, dust the top with cornmeal. Using the silicone spatula as an aid, gently roll the dough from the bowl onto a plate/baking sheet/whatever will fit in your fridge, so that the cornmeal covered side faces down. Sprinkle the other side of the dough with cornmeal and gently shape the dough into a short oblong log with your hands.
7. Using a kitchen plastic bag, place the baking sheet inside and tie the corners of the bag together to create a bubble. Place this in the fridge keeping the plastic bag tucked under to create a bubble of sorts. Let the the bread rest in the fridge overnight for 10-12 hours, until ready to bake the next day.

8. In the morning, at least 30 minutes before your desired baking time, preheat the oven to 500º F, and place a baking sheet or pizza stone on the middle rack in the oven. Fill up a roasting pan with about 1 inch of water and place on the bottom rack in the oven. If you are using a pizza stone, let the oven preheat at 500 for an additional 15 minutes to get the stone really hot, this helps create a crisp bottom crust.
9. Right before baking, remove the bread from the fridge and dust again with cornmeal. Then invert the loaf, so that bottom becomes the top. Score the bread with a knife, creating three 1/2” diagonal cuts and sprinkle the top with a little more cornmeal. The cuts free the top of the bread to continue expanding so that the crust doesn’t harden too fast a prevent a good rise. The cornmeal creates an extra crunchy crust that I found hard to achieve without.
10. Carefully transfer to the hot baking sheet/stone and cover with a high lid or some aluminum foil, and make sure there is no weight pressing on the bread, that would inhibit the rise. Bake covered for 30 minutes, then remove the cover and bake for another 30-35 minutes. The crust should achieve a beautiful dark golden brown and will feel really crisp to the touch, and will sound hollow when gently tapped with your finger.
11. Cool on a baking rack for at least an hour (do not break it open earlier! The temptation will be fierce). As it cools the moisture distributes, cutting it open before the bread has cooled will leave it overly moist and dense. Store loosely covered in til foil or in a bread box for up to 3 days (unless there is a very humid environment). For the best long term storage and freshest taste, the day after baking, slice the bread and freeze in a ziploc bag for up to 1 month.


Gluten-Free Whole Grain Sourdough Bread: Master Recipe
Ingredients:
- 140g buckwheat flour (1 cup)
- 80g brown rice flour (1/2 cup)
- 80g oat flour (1/2 cup + 2 tbsp)
- 70g tapioca flour (1/2 cup)
- 70g arrowroot flour (1/2 cup)
- 32g ground flax seed (1/4 cup)
- 20g ground psyllium husk powder (2 tbsp)
- 540g water (2 1/4 cups)
- 150g active room temperature sourdough starter (1/2 cup)
- 14g fine sea salt (2 tsp)
- 15g maple syrup (2 tsp)
- 13g olive oil (1 tbsp)
- Cornmeal (for dusting)
Instructions:
- About 13 hours before you’d like to bake the bread, in a large mixing bowl thoroughly combine all dry mix ingredients, preferably by weight*
- In a medium bowl measure out the flax seed, psyllium and sourdough starter, then pour the water overtop. Stir vigorously so that the mixture becomes a smooth viscous liquid. Add the salt and maple syrup and mix again
- Mixing by hand**: With a soup spoon or large wooden spoon in hand, pour the wet ingredients into the dry and immediately start stirring vigorously in circles in the center. As more of the dry ingredients are incorporated, you can begin widening the circle and trying to incorporate all the flour into the wet ingredients. Put some muscle into it, the dough will be quite thick and sticky! I don’t recommend using your hands to mix.
- Once the dough is well combined, it will look like a wet, shaggy ball of dough. Add the olive oil across the top and sides of the dough and with the spoon or a silicone/baking spatula if you have one, spread the olive oil on all sides of the dough while simultaneously smoothing and shaping the dough into more of a ball.
- Cover the dough so that it is airtight*** and leave to rise in a non-drafty, warm place for about 2-3 hours (depending on the temperature)
- You are looking for the dough to expand but not double. It’s great if you can use a glass bowl for this stage so you can look at the bottom of the dough and see if air pockets have appeared (won’t be as visible from the top)
- After the dough has expanded, dust the top with cornmeal. Using the silicone spatula as an aid, gently roll the dough from the bowl onto a baking sheet, so that the cornmeal covered side faces down.
- Sprinkle the other side of the dough with cornmeal and gently shape the dough into a short oblong log with your hands.****
- Using a plastic bag*****, place the sheet inside and tuck the ends of the bag under the sheet o. Place this in the fridge keeping the plastic bag tucked under to create a bubble
- Let the the bread rest in the fridge overnight for 10-15 hours
- In the morning, at least 30 minutes before desire baking time, preheat the oven to 500℉, and place a baking sheet or pizza stone on the middle rack in the oven. Fill up a roasting pan with about 1 inch of water and place on the bottom rack in the oven. If using a pizza stone, let preheat at 500 for an additional 15 minutes to get the stone really hot
- Right before remove the bread from the fridge and dust again with cornmeal. Then invert the loaf, so that bottom becomes the top. Score the bread with a knife, creating three 1/2” diagonal cuts and sprinkle the top with a little more cornmeal.
- Carefully transfer to the hot baking sheet/stone and cover with a tall lid or an aluminum foil tent, and make sure there is no weight pressing on the bread
- Bake covered for 30 minutes, then remove the cover and bake for another 30-35 minutes. The crust should achieve a beautiful dark golden brown and will feel really crisp to the touch
- Cool on a baking rack for at least an hour (the temptation to break it open earlier will be fierce!)
- Store loosely covered in til foil or in a bread box for up to 3 days (unless there is a very humid environment). For the best long term storage and freshest taste, the day after baking, slice the bread and freeze in a ziploc bag for up to 1 month.
Recipe Notes:
Calories
220.85Fat (grams)
3.92Sat. Fat (grams)
0.55Carbs (grams)
43.25Fiber (grams)
4.76Net carbs
38.48Sugar (grams)
1.49Protein (grams)
5.28Sodium (milligrams)
462.17Cholesterol (grams)
0.00
